
Building a larger, stronger chest is a common goal for many individuals pursuing fitness. Beyond aesthetics, a well-developed chest contributes to overall upper body strength, functional movement, and can even improve posture. However, achieving significant chest growth requires more than just indiscriminately lifting heavy weights. It demands a strategic approach, focusing on exercises that effectively stimulate the pectoral muscles, combined with proper form, progressive overload, and adequate recovery.
This comprehensive guide will delve into the science behind chest development and present seven exercises that are not only popular but also backed by scientific principles for their efficacy. We’ll explore the anatomy of the chest, the fundamental principles of muscle hypertrophy, and then break down each exercise, providing detailed instructions, tips for maximizing muscle activation, and common mistakes to avoid. Whether you’re a beginner looking to establish a solid foundation or an experienced lifter seeking to optimize your routine, this article will equip you with the knowledge and tools to sculpt a more impressive and powerful chest.
Understanding Chest Anatomy and Function
To effectively train the chest, it’s crucial to understand its anatomy and the functions of its primary muscles. The chest is primarily composed of the pectoralis major and pectoralis minor muscles, with the serratus anterior also playing a supportive role.
Pectoralis Major
The pectoralis major is the largest and most superficial muscle of the chest. It’s a broad, fan-shaped muscle that originates from the clavicle (collarbone), sternum (breastbone), and the cartilages of the first six ribs, and inserts into the humerus (upper arm bone). The pectoralis major is typically divided into two main heads:
- Clavicular Head (Upper Chest): Originating from the clavicle, this head is primarily responsible for shoulder flexion (lifting the arm forward) and horizontal adduction (bringing the arm across the body). Exercises that involve an incline target this portion more effectively.
- Sternal Head (Mid and Lower Chest): Originating from the sternum and ribs, this larger head is responsible for horizontal adduction, adduction (bringing the arm down), and internal rotation of the humerus. Most pressing movements heavily engage the sternal head.
Pectoralis Minor
Located underneath the pectoralis major, the pectoralis minor is a smaller, triangular muscle. It originates from the third, fourth, and fifth ribs and inserts into the coracoid process of the scapula (shoulder blade). Its primary functions include scapular protraction (pulling the shoulder blade forward), depression (pulling it down), and downward rotation. While not directly involved in pressing movements like the pectoralis major, a strong pectoralis minor contributes to shoulder stability and overall scapular health, which is vital for safe and effective chest training.
Serratus Anterior
Often overlooked in chest training, the serratus anterior muscles are located on the side of the chest wall, covering the upper eight or nine ribs. They originate from these ribs and insert into the medial border of the scapula. The serratus anterior plays a crucial role in protracting the scapula, which helps to stabilize the shoulder joint during pushing movements and keeps the shoulder blades flush against the rib cage. Strengthening the serratus anterior can improve shoulder health and contribute to better pressing mechanics.
Principles of Muscle Hypertrophy for Chest Growth
Building muscle size (hypertrophy) is a complex physiological process that requires adherence to several key training principles. When applied to chest training, these principles form the foundation of an effective program.
1. Progressive Overload
This is arguably the most fundamental principle for muscle growth. To continue growing, your muscles must be consistently challenged with increasing demands. For chest training, progressive overload can be achieved by:
- Increasing the weight: Gradually lifting heavier loads over time.
- Increasing repetitions: Performing more reps with a given weight.
- Increasing sets: Adding more sets to your workout.
- Decreasing rest times: Reducing the time between sets to increase training density.
- Improving form: Lifting the same weight with better technique, allowing for more muscle activation.
- Increasing time under tension (TUT): Slowing down the eccentric (lowering) phase of an exercise or pausing at the stretched position to prolong muscle engagement.
Without progressive overload, your muscles will adapt to the current stimulus and stop growing.
2. Volume
Training volume refers to the total amount of work performed in a workout or over a period. It’s typically calculated as sets x reps x weight. For hypertrophy, a moderate to high training volume is generally recommended. For chest, this might mean performing 10-20 sets per week, distributed across different exercises and workout days. However, individual optimal volume can vary based on training experience, recovery capacity, and other factors.
3. Intensity
Intensity in resistance training refers to the percentage of your one-repetition maximum (1RM) you are lifting. For hypertrophy, lifting weights in the 60-85% of 1RM range (typically 6-12 repetitions to failure or close to failure) is generally effective. This range provides sufficient mechanical tension and metabolic stress, both of which are crucial for muscle growth.
4. Frequency
Training frequency refers to how often you train a particular muscle group. For optimal chest growth, training the pectorals 2-3 times per week, with adequate rest between sessions, has been shown to be effective. This allows for repeated muscle protein synthesis (the process of repairing and building muscle tissue) without overtraining.
5. Time Under Tension (TUT)
TUT refers to the amount of time a muscle is under stress during a set. By controlling the eccentric (lowering) and concentric (lifting) phases of an exercise, you can increase TUT. For example, a slow, controlled lowering phase of a push-up or bench press can increase muscle activation and promote growth. Aim for a controlled tempo, such as a 2-0-2-0 tempo (2 seconds eccentric, 0 second pause at the bottom, 2 seconds concentric, 0 second pause at the top).
6. Mind-Muscle Connection
While often overlooked, establishing a strong mind-muscle connection is vital for maximizing muscle activation. This involves actively focusing on contracting the target muscle (your chest) throughout the entire range of motion, rather than just moving the weight from point A to point B. Visualizing your chest muscles working can significantly improve their recruitment.
7. Nutrition and Recovery
Muscle growth doesn’t happen in the gym; it happens during recovery. Adequate protein intake is essential for muscle repair and synthesis. Aim for 1.6-2.2 grams of protein per kilogram of body weight per day. Sufficient calories are also necessary to fuel muscle growth. Additionally, prioritizing sleep (7-9 hours per night) and managing stress are crucial for optimal recovery and hormone balance.
The 7 Scientifically Proven Exercises for a Bigger Chest
Now that we understand the anatomy and principles, let’s dive into the exercises that will form the cornerstone of your chest-building routine. These exercises target different areas of the pectorals and utilize various movement patterns to ensure comprehensive development.
1. Barbell Bench Press (Flat)

Why it’s effective: The barbell bench press is often considered the king of all chest exercises for good reason. It allows you to lift the heaviest loads, leading to significant mechanical tension and strength gains. It primarily targets the sternal head of the pectoralis major, along with contributions from the anterior deltoids and triceps.
How to perform:
- Setup: Lie on a flat bench with your eyes directly under the barbell. Grip the bar slightly wider than shoulder-width apart, ensuring your wrists are stacked directly over your forearms. Your feet should be flat on the floor, providing a stable base.
- Unrack: Take a deep breath, brace your core, and unrack the bar. Position it directly over your chest with your arms fully extended.
- Descent: Slowly lower the bar towards your mid-chest, maintaining control. Ensure your elbows are tucked slightly (around 45-60 degrees from your torso) to protect your shoulders. Lower until the bar lightly touches your chest or just above it.
- Ascent: Drive the bar back up to the starting position by pushing through your chest, shoulders, and triceps. Exhale as you push.
- Focus: Squeeze your chest at the top of the movement.
Common Mistakes to Avoid:
- Flaring elbows too wide: This puts excessive stress on the shoulder joints.
- Bouncing the bar off your chest: This reduces muscle activation and increases injury risk.
- Lifting your hips off the bench: This reduces stability and can lead to lower back strain.
- Insufficient range of motion: Not lowering the bar enough diminishes the stretch on the pecs.
2. Incline Dumbbell Press

Why it’s effective: The incline dumbbell press specifically targets the clavicular head (upper chest) of the pectoralis major. Using dumbbells allows for a greater range of motion and also helps to identify and correct muscular imbalances between the left and right sides of your chest.
How to perform:
- Setup: Set an adjustable bench to an incline of 30-45 degrees. Lie back on the bench with a dumbbell in each hand, resting them on your thighs. Kick the dumbbells up to your shoulders one at a time.
- Starting Position: Press the dumbbells directly above your chest, palms facing forward, with your arms fully extended but not locked.
- Descent: Slowly lower the dumbbells out to your sides in a controlled arc, keeping your elbows slightly tucked. Lower until your elbows are below the level of the bench, feeling a stretch in your upper chest.
- Ascent: Drive the dumbbells back up to the starting position, squeezing your upper chest at the top. Imagine bringing your biceps together at the peak of the movement.
Common Mistakes to Avoid:
- Too steep an incline: An incline that is too steep will shift the focus more to the front deltoids.
- Not controlling the descent: Dropping the dumbbells quickly reduces time under tension and increases injury risk.
- Allowing dumbbells to touch at the top: This can reduce continuous tension on the chest muscles.
- Using excessive weight: This can compromise form and lead to shoulder strain.
3. Dumbbell Flyes (Flat or Incline)
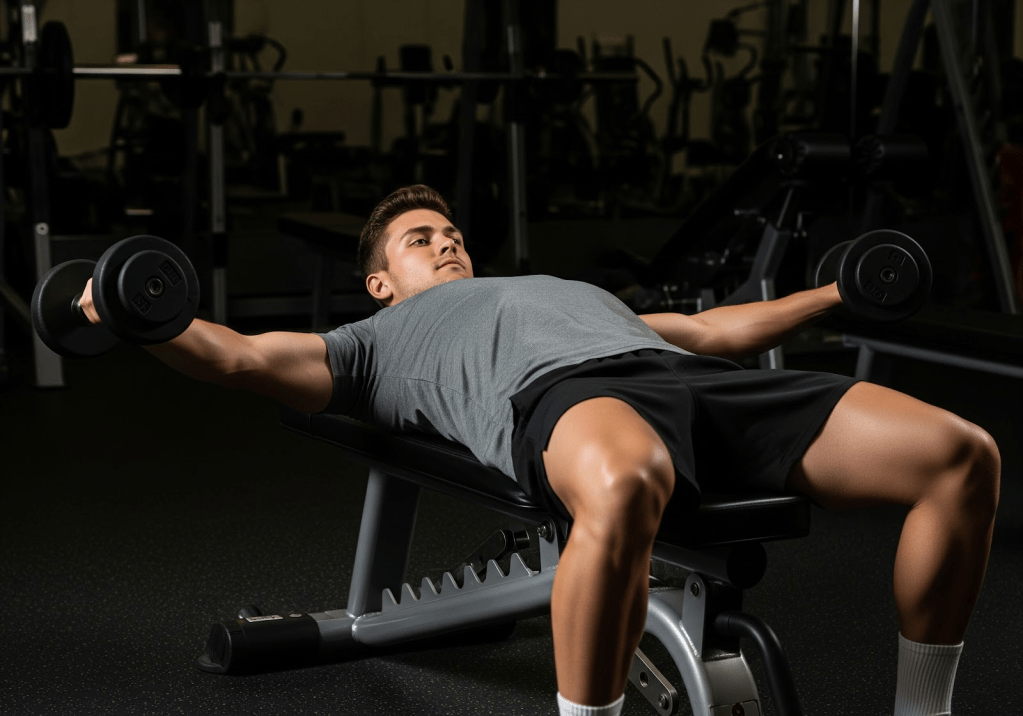
Why it’s effective: Dumbbell flyes are an isolation exercise that emphasizes the stretching and contracting of the pectoralis major, particularly at the outer edges of the chest. They provide a unique stimulus that pressing movements don’t fully offer.
How to perform (Flat Bench):
- Setup: Lie on a flat bench with a dumbbell in each hand, palms facing each other. Extend your arms directly above your chest with a slight bend in your elbows (to protect the joints).
- Descent: Slowly open your arms out to the sides in a wide arc, maintaining the slight elbow bend. Lower until you feel a deep stretch in your chest, with your arms roughly parallel to the floor.
- Ascent: Squeeze your chest muscles to bring the dumbbells back up to the starting position, maintaining the arc. Imagine hugging a tree.
- Focus: The movement should be initiated and controlled by your chest, not your arms or shoulders.
Common Mistakes to Avoid:
- Straight arms: This puts immense pressure on the elbow joints. Always maintain a slight bend.
- Using too much weight: Flyes are not a heavy strength exercise. Focus on control and the stretch.
- Turning it into a press: The movement should be an arc, not a straight push.
- Arching the back excessively: Maintain a neutral spine.
4. Push-ups (Variations)
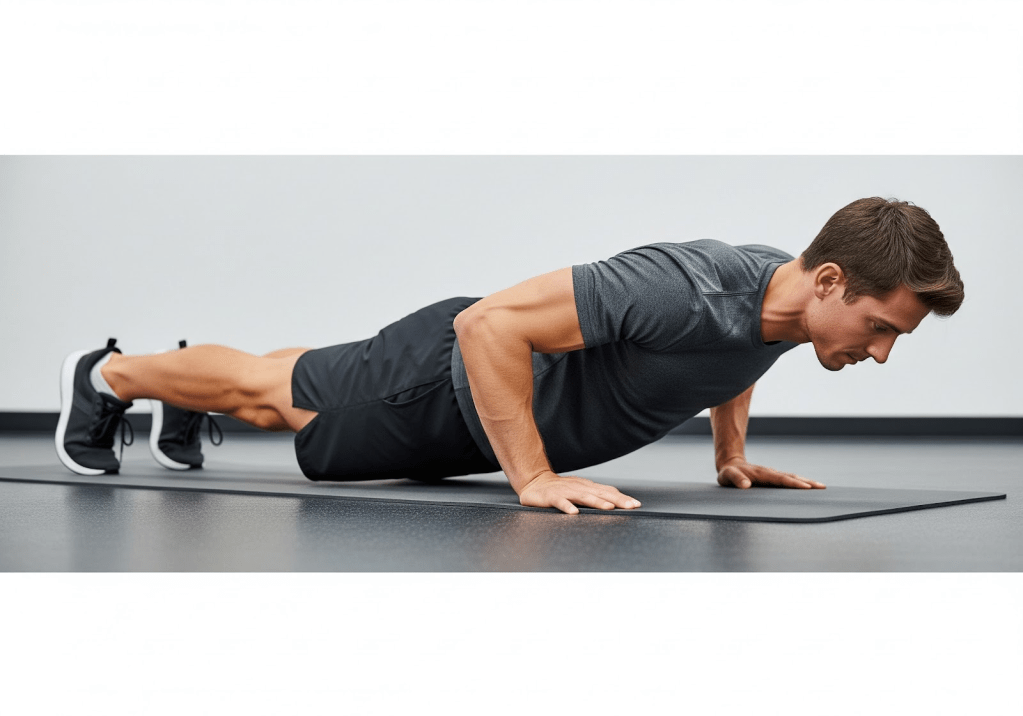
Why it’s effective: Don’t underestimate the power of the humble push-up. It’s a fantastic bodyweight exercise that engages the entire pectoralis major, triceps, and anterior deltoids, while also building core strength and stability. Its versatility allows for numerous variations to progressively increase difficulty.
How to perform (Standard Push-up):
- Setup: Start in a plank position with your hands slightly wider than shoulder-width apart, fingers pointing forward. Your body should form a straight line from your head to your heels.
- Descent: Lower your chest towards the floor by bending your elbows, keeping them tucked slightly towards your body. Go as deep as you can without letting your hips sag or arching your back.
- Ascent: Push through your hands to return to the starting plank position, fully extending your arms and squeezing your chest.
- Focus: Maintain core engagement throughout the entire movement.
Progressive Variations:
- Knee Push-ups: For beginners, perform on your knees.
- Incline Push-ups: Hands elevated on a bench or sturdy surface (easier).
- Decline Push-ups: Feet elevated on a bench or sturdy surface (harder, targets upper chest).
- Weighted Push-ups: Place a weight plate on your upper back.
- Plyometric Push-ups: Explode off the ground at the top.
Common Mistakes to Avoid:
- Sagging hips: Indicates a weak core.
- Arching the back: Also indicates weak core and can cause back pain.
- Flaring elbows excessively: Puts stress on the shoulders.
- Not going deep enough: Limits the range of motion and muscle activation.
5. Cable Crossovers (High-to-Low or Mid-Pulley)

Why it’s effective: Cable crossovers provide constant tension throughout the entire range of motion, which is excellent for hypertrophy. They are particularly effective for isolating the pectoralis major and enhancing the “squeeze” at the peak contraction. Different pulley heights allow you to target different parts of the chest.
How to perform (Mid-Pulley):
- Setup: Stand in the middle of a cable crossover machine with a handle attached to each high or mid-level pulley. Grab a handle in each hand, take a step forward to create tension, and lean slightly forward with a slight bend in your knees.
- Starting Position: Extend your arms out to the sides, maintaining a slight bend in your elbows. You should feel a stretch in your chest.
- Movement: Bring the handles together in a wide arc in front of your chest, squeezing your pecs at the peak contraction. Imagine hugging a barrel.
- Return: Slowly reverse the motion, allowing your arms to return to the starting position while maintaining control and feeling the stretch.
Variations:
- High-to-Low: Cables set at the highest point, bringing handles down towards your waist. Emphasizes lower chest.
- Mid-Pulley: Cables set at shoulder height, bringing handles straight across. Emphasizes mid-chest.
- Low-to-High: Cables set at the lowest point, bringing handles up towards your shoulders. Emphasizes upper chest.
Common Mistakes to Avoid:
- Using too much weight: This often leads to using momentum and less chest activation.
- Bending the elbows too much: This turns it into a triceps exercise.
- Standing too upright: Leaning forward helps to engage the chest more effectively.
- Not controlling the negative: Let the cables pull your arms back slowly to maximize the stretch.
6. Machine Chest Press

Why it’s effective: The machine chest press offers a stable and controlled environment, making it an excellent option for beginners to learn proper pressing mechanics or for advanced lifters to train to failure safely. It minimizes the need for stabilization, allowing for maximum focus on chest contraction.
How to perform:
- Setup: Adjust the seat height so that the handles are at mid-chest level. Sit firmly against the backrest with your feet flat on the floor. Choose an appropriate weight.
- Grip: Grip the handles with an overhand grip, slightly wider than shoulder-width apart.
- Press: Push the handles forward until your arms are fully extended but not locked. Exhale as you press and squeeze your chest.
- Return: Slowly allow the handles to return to the starting position, controlling the weight throughout the eccentric phase. Feel the stretch in your chest.
Common Mistakes to Avoid:
- Not fully extending: Limits the range of motion.
- Letting the weight slam back: Reduces control and time under tension.
- Shrugging shoulders: Keep your shoulders down and back.
- Using only arms: Focus on initiating the movement with your chest.
7. Dips (Chest Version)

Why it’s effective: Dips are a powerful compound exercise for developing the lower and outer chest, as well as the triceps and anterior deltoids. The bodyweight nature allows for a significant stretch on the pecs, and the exercise can be progressively overloaded with added weight.
How to perform (Chest-focused):
- Setup: Grasp parallel bars with an overhand grip, hands slightly wider than shoulder-width apart. Lift yourself up so your arms are fully extended and your feet are off the ground.
- Lean Forward: Crucially, lean your torso forward significantly. This shifts the emphasis from your triceps to your chest.
- Descent: Slowly lower your body by bending your elbows, keeping them flared out slightly. Go as deep as possible, allowing your shoulders to go below your elbows, feeling a deep stretch in your lower chest.
- Ascent: Push through the palms of your hands to return to the starting position, focusing on contracting your chest as you drive upwards.
Common Mistakes to Avoid:
- Staying too upright: This turns it into a triceps-dominant exercise.
- Not going deep enough: Limits the stretch and effectiveness for the chest.
- Shrugging shoulders: Keep your shoulders depressed and retracted.
- Using momentum: Control the entire movement.
Progressive Overload for Dips:
- Assisted Dips: Use an assisted dip machine or resistance bands if you can’t perform full bodyweight dips.
- Bodyweight Dips: Focus on increasing reps.
- Weighted Dips: Add a dip belt with weight plates or hold a dumbbell between your feet.
Integrating These Exercises into Your Routine
Now that you have a comprehensive understanding of each exercise, it’s time to build a routine. Remember, individual needs and recovery capacity vary, so this is a general guideline.
Sample Chest Workout (Intermediate/Advanced):
| Exercise | Sets | Reps | Rest (seconds) | Focus |
|---|---|---|---|---|
| Barbell Bench Press (Flat) | 3-4 | 6-10 | 90-120 | Overall Mass & Strength |
| Incline Dumbbell Press | 3 | 8-12 | 60-90 | Upper Chest Development |
| Machine Chest Press | 3 | 10-15 | 60 | Controlled Contraction, High Reps |
| Dumbbell Flyes (Flat or Incline) | 3 | 12-15 | 45-60 | Stretch & Isolation |
| Cable Crossovers (Mid-Pulley) | 3 | 12-15 | 45-60 | Constant Tension, Peak Contraction |
| Dips (Chest Version) | 3 | To Failure | 60-90 | Lower/Outer Chest, Bodyweight Strength |
| Push-ups (Decline or Weighted) | 3 | To Failure | 45-60 | Overall Chest Endurance & Stability |
Considerations for Program Design:
- Frequency: Train chest 1-3 times per week, depending on your recovery and overall training split. If you train chest twice a week, consider varying the exercises or intensity between sessions.
- Warm-up: Always start with a dynamic warm-up that includes light cardio, arm circles, and light sets of the exercises you’ll be performing.
- Cool-down: Finish with static stretches for the chest and shoulders.
- Progression: Continuously strive for progressive overload by increasing weight, reps, or sets over time.
- Listen to Your Body: Pay attention to signs of overtraining or pain. Adjust your routine as needed.
- Variety: Periodically change your exercises, rep ranges, or set schemes to keep your muscles adapting and prevent plateaus.
Advanced Techniques for Maximizing Chest Growth
Once you’ve mastered the basics and are consistently progressing, you can incorporate some advanced training techniques to further stimulate chest growth.
1. Drop Sets
After completing a set to failure, immediately reduce the weight by 20-30% and continue performing reps until failure again. You can do this once or twice within a single “drop set.” This technique dramatically increases training volume and metabolic stress.
2. Supersets
Perform two different exercises back-to-back with no rest in between. For chest, you could superset a compound movement with an isolation movement, such as Incline Dumbbell Press immediately followed by Incline Dumbbell Flyes. This increases training density and time under tension.
3. Partial Reps
After reaching full range-of-motion failure on an exercise, perform a few more partial reps (e.g., the top half or bottom half of the movement). This can help to squeeze out extra repetitions and further fatigue the muscle.
4. Forced Reps
With a spotter’s help, perform 1-2 extra repetitions beyond what you could do on your own. The spotter should provide just enough assistance to help you complete the rep. Use this sparingly, as it’s very taxing on the central nervous system.
5. Negative Reps (Eccentric Training)
Focus on the lowering (eccentric) phase of an exercise, making it longer and more controlled (e.g., 3-5 seconds). You can use a heavier weight than you can lift concentrically, and a spotter can help you get the weight into the starting position. The eccentric phase is crucial for muscle damage and growth.
6. Rest-Pause
Perform a set to failure, rest for 10-20 seconds, and then perform a few more reps with the same weight. Rest again for 10-20 seconds and do another mini-set. This allows for more total reps with a given weight than a straight set.
Caution: Advanced techniques should be used sparingly (e.g., 1-2 exercises per workout, once a week for a specific muscle group) to avoid overtraining and injury. They are intense and require good recovery.
The Role of Nutrition and Supplements
Building a bigger chest, or any muscle, is an anabolic process that requires adequate fuel and building blocks.
Macronutrients
- Protein: Absolutely critical for muscle repair and growth. Aim for 1.6-2.2 grams per kilogram of body weight per day. Good sources include lean meats, poultry, fish, eggs, dairy, and plant-based proteins like legumes and tofu.
- Carbohydrates: Your primary energy source for intense workouts and for replenishing glycogen stores. Aim for 3-5 grams per kilogram of body weight, adjusting based on activity level. Choose complex carbohydrates like whole grains, fruits, and vegetables.
- Fats: Essential for hormone production and overall health. Aim for 0.8-1 gram per kilogram of body weight. Healthy sources include avocados, nuts, seeds, olive oil, and fatty fish.
Caloric Intake
To build muscle, you generally need to be in a slight caloric surplus (eating more calories than you burn). This provides the energy necessary for muscle protein synthesis. A surplus of 250-500 calories per day is a good starting point, but this will vary by individual.
Hydration
Water plays a vital role in every bodily function, including nutrient transport and muscle contractions. Ensure you are drinking plenty of water throughout the day, especially around your workouts.
Key Supplements (Optional)
While a solid diet is paramount, certain supplements can complement your efforts:
- Whey Protein: Convenient for increasing protein intake, especially post-workout.
- Creatine Monohydrate: One of the most researched and effective supplements for increasing strength, power, and muscle mass.
- Caffeine: Can improve performance and reduce perceived exertion during workouts.
- Branched-Chain Amino Acids (BCAAs): May help reduce muscle soreness and promote recovery, though a high-protein diet often provides sufficient BCAAs.
Remember, supplements are meant to supplement a good diet, not replace it.
Common Mistakes Hindering Chest Growth
Beyond improper exercise form, several other factors can impede your chest development.
1. Overtraining
More isn’t always better. Training your chest too frequently or with excessive volume without adequate rest can lead to overtraining, which can result in:
- Decreased performance
- Prolonged muscle soreness
- Fatigue
- Increased injury risk
- Plateaus
- Hormonal imbalances
Ensure you’re allowing enough time (48-72 hours) for your chest muscles to recover and rebuild between sessions.
2. Under-Recovery and Poor Sleep
Muscle growth happens during rest. If you’re consistently getting less than 7-9 hours of quality sleep, your body’s ability to repair muscle tissue and produce growth-promoting hormones (like growth hormone and testosterone) will be compromised. Stress management is also crucial, as chronic stress can elevate cortisol, a catabolic hormone that breaks down muscle.
3. Neglecting Different Angles
Only performing flat bench press will lead to an underdeveloped upper or lower chest. It’s crucial to incorporate incline, flat, and decline (or dip) movements to ensure comprehensive development of all heads of the pectoralis major.
4. Focusing Only on Heavy Weight
While lifting heavy is important for strength and mechanical tension, constantly chasing maximum weight without prioritizing form or mind-muscle connection can lead to:
- Increased injury risk
- Recruitment of secondary muscles (shoulders, triceps) over the chest
- Reduced time under tension
Incorporate varied rep ranges and focus on controlled movements.
5. Inconsistent Training
Muscle growth is a marathon, not a sprint. Consistency is key. Sporadic workouts, skipping chest day, or inconsistent adherence to your program will yield suboptimal results. Stick to a well-structured routine for at least 8-12 weeks before making significant changes.
6. Poor Mind-Muscle Connection
If you’re just going through the motions without actively thinking about squeezing your chest, you’re missing out on a powerful hypertrophy stimulus. Slow down your reps, reduce the weight if necessary, and truly focus on feeling your pecs work throughout the movement.
7. Neglecting Shoulder Health
The shoulders are intimately involved in almost all chest exercises. Poor shoulder mobility, instability, or pre-existing injuries can severely limit your ability to train chest effectively and safely. Incorporate rotator cuff exercises, scapular stabilization drills, and proper warm-ups to maintain healthy shoulders.
Conclusion
Building a bigger, stronger chest is a rewarding endeavor that requires a combination of scientific knowledge, consistent effort, and smart programming. By understanding the anatomy of your chest, adhering to the principles of muscle hypertrophy, and strategically incorporating the seven scientifically proven exercises outlined in this guide, you can unlock your full chest-building potential.
Remember that progress is rarely linear. There will be plateaus, and there may be times when motivation wanes. However, by staying consistent, prioritizing proper form, progressively overloading your muscles, and ensuring adequate nutrition and recovery, you will steadily carve out the impressive and powerful chest you desire. Implement these strategies into your routine, be patient, and watch your chest transform. Good luck on your journey to a bigger, stronger chest!
Disclaimer
The information provided in this article is for educational purposes only and should not be considered medical advice. Always consult with a qualified healthcare professional or certified fitness trainer before starting any new exercise program or making changes to your diet.

Leave a comment